 Save
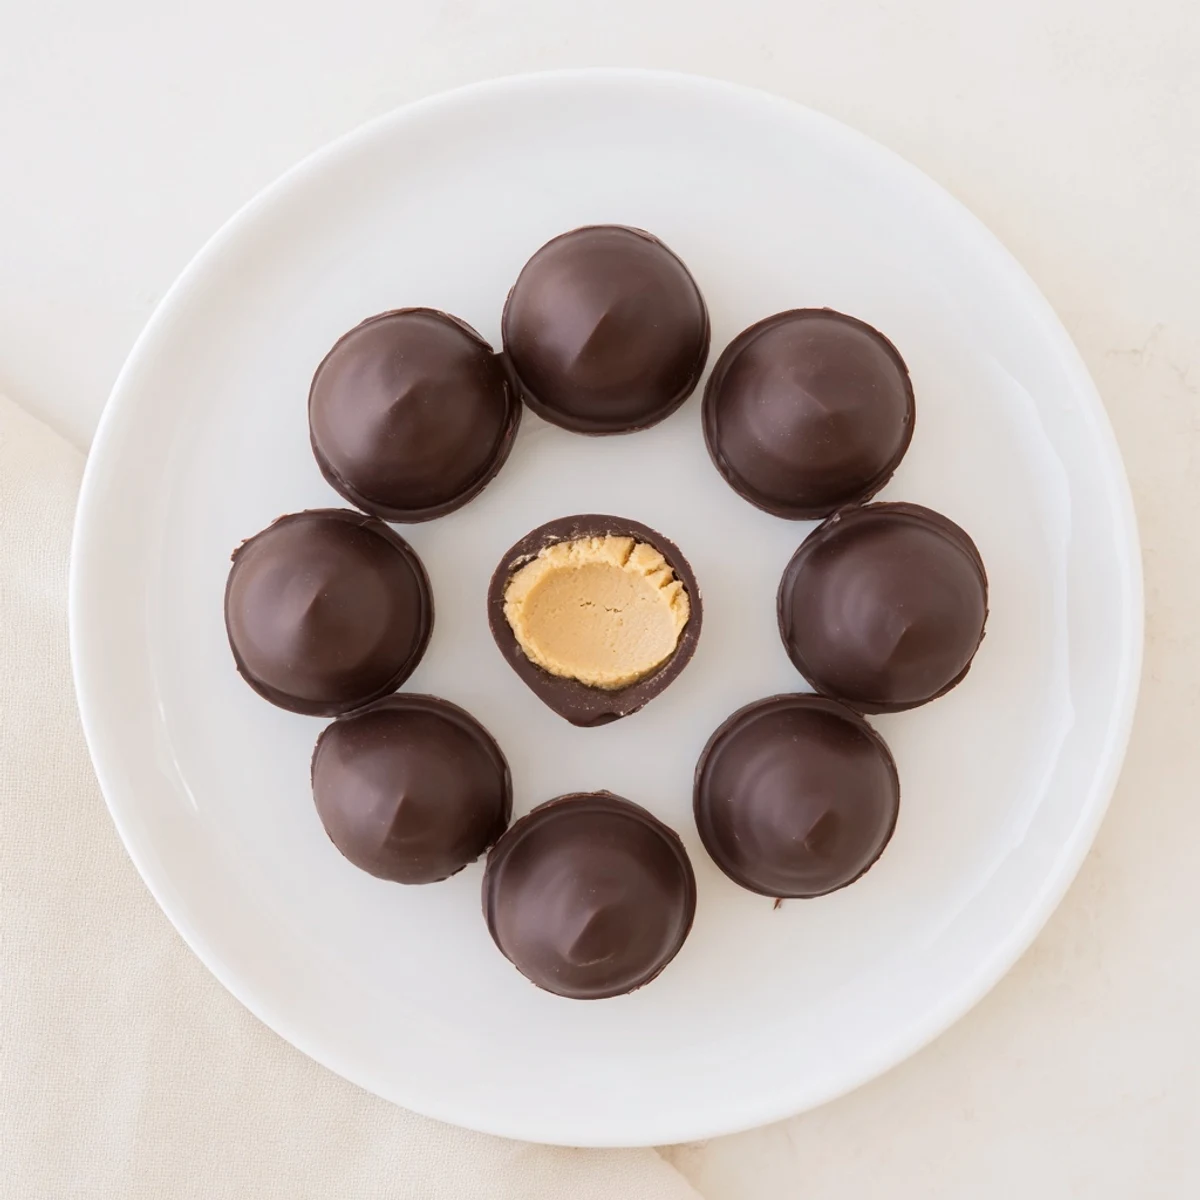
Save These peanut butter eggs combine creamy peanut butter, softened butter, vanilla and powdered sugar into a pliable filling you shape by hand. Chill the formed eggs for 30 minutes, then dip in melted chocolate with a touch of coconut oil for shine. After a final chill they set firm. Variations include crunchy peanut butter, pretzels in the filling, or a white chocolate coating for a sweeter finish.
The scent of melted chocolate always manages to lure anyone into the kitchen. The first time I made these homemade peanut butter eggs, I was captivated by the way the creamy filling and silky coating came together with surprising ease. There’s a little thrill in shaping each egg by hand and watching a rustic row appear on parchment. I couldn’t help but sneak a taste before they even made it to the fridge.
One spring afternoon, my brother and I decided to whip up a batch of these eggs for Easter baskets. We traded stories while carefully dipping each peanutty oval into glossy chocolate, competing to see who could make theirs the smoothest. Some ended up a little lopsided but tasted just as good. By the end, neither of us minded chocolate-splattered fingers because we’d already made plans to snack on the messy ones first.
Ingredients
- Creamy peanut butter: Choose a no-stir, classic creamy peanut butter for the smoothest filling—natural versions can be too oily.
- Unsalted butter, softened: Soft butter blends right in, making the filling luscious and rich.
- Powdered sugar: This binds the filling and gives each bite its distinct melt-in-your-mouth sweetness—sift if lumpy.
- Vanilla extract: Just a teaspoon lifts the peanut butter flavor and adds warmth.
- Pinch of salt: Don’t skip this—salt subtly sharpens and balances the sweet and nutty notes.
- Semi-sweet or milk chocolate chips: Use whichever you like best or a mix, just be sure to pick chocolate that melts smoothly.
- Coconut oil or vegetable shortening: This helps the chocolate set with a shinier, softer snap.
Instructions
- Mix up the filling:
- In a big bowl, beat together the peanut butter and softened butter until it’s creamy and inviting. The mixture should look velvety and smell undeniably peanutty.
- Sweeten and shape:
- Add in the vanilla, salt, and powdered sugar little by little, blending until a thick, doughy mass forms. It’s okay if your hands get a bit sticky here—it means you’re doing it right.
- Form your eggs:
- Scoop out mounds of dough—about two tablespoons each—and gently shape them into egg-like ovals on a parchment-lined baking sheet. They don’t have to be perfect; the chocolate covers any quirks.
- Chill the batch:
- Pop the tray in the fridge for at least 30 minutes so the shapes stay firm when you dip them later. Resist the urge to sample, at least for now.
- Melt the chocolate:
- In a microwave-safe bowl, melt the chocolate with coconut oil in short bursts, stirring between each, until completely smooth and glossy. Take in the sweet aroma filling the kitchen.
- Dip and coat:
- With a fork or dipping tool, cover each peanut butter egg with the melted chocolate, letting any excess drip off before returning to the sheet. This part is satisfyingly messy.
- Set the shells:
- Chill the coated eggs in the fridge until the chocolate is firm and snappy—about 15 to 20 minutes, give or take. Try not to eat them all immediately.
- Store for later:
- Transfer the finished eggs to an airtight container in the refrigerator to keep them fresh and ready for sharing (or sneaking solo).
 Save
Save There was a moment when I watched a friend bite into one of these eggs, eyes wide at the first taste, and realized that homemade candy transforms ordinary days into something a little magical. That simple joy of sharing, with chocolate smudged grins all around, is what keeps me making them year after year.
How to Nail the Texture Every Time
If you notice your filling feels too sticky to shape, don’t panic—just add a little more powdered sugar until it holds together. On especially hot days, I’ve even tucked the dough in the fridge for 10 minutes before shaping. It’s a quick fix that makes the eggs less messy to form and helps keep your kitchen (and fingers) cleaner.
Different Ways to Decorate
The finishing touches always spark creativity. I like to drizzle a little extra chocolate on top in zig-zags or add colorful sprinkles for a festive twist, especially if kids are helping out. White chocolate works well here too, and crushed pretzels give a fun salty crunch if you want to play with the texture.
Troubleshooting and Storing Tips
Sometimes I worry the chocolate will bloom (develop white spots) if stored too long, but keeping the eggs chilled in an airtight container helps prevent this. If you’re making them ahead, layer parchment or wax paper between rows to avoid sticking, especially on humid days. And don’t be afraid to tuck in a small piece of bread or marshmallow in the container—it’ll keep the eggs soft by maintaining some moisture inside.
- If your chocolate thickens while dipping, gently rewarm it for a few seconds and stir.
- Let the dipped eggs set fully before moving to avoid fingerprints.
- Hide a few eggs in the back of the fridge for yourself; trust me on this one.
 Save
Save Share these homemade peanut butter eggs with friends or keep a stash just for you—either way, every bite is a little piece of kitchen happiness. Enjoy the sweet satisfaction of every creamy, chocolatey mouthful.
Common Recipe Questions
- → Can I use crunchy peanut butter?
-
Yes. Crunchy peanut butter adds texture to the centers; if you prefer a smoother finish, pulse in a food processor briefly or use creamy peanut butter for a silkier mouthfeel.
- → How do I get a glossy chocolate coating?
-
Add a small amount of coconut oil or vegetable shortening to melted chocolate and stir until smooth. Avoid overheating and stir frequently to maintain a glossy finish.
- → How long do they keep in the fridge or freezer?
-
Store in an airtight container in the refrigerator for up to 2 weeks. For longer storage, freeze on a tray until firm, then transfer to a sealed container for up to 2 months; thaw in the fridge before serving.
- → Can I swap the chocolate for white chocolate?
-
Yes. Use high-quality white chocolate and melt gently to avoid graininess; adding a little coconut oil can help with texture and shine. Consider reducing added sugar in the filling if needed.
- → How can I shape the centers neatly?
-
Portion the filling with a cookie scoop or spoon, lightly wet your hands, and roll into an egg shape. Chill on parchment for 30 minutes so they hold form when dipping.
- → Any allergy-friendly substitutions?
-
For a peanut-free option, substitute sunflower seed butter and check all labels for hidden allergens. Use dairy-free chocolate to remove milk ingredients and confirm gluten-free status on packaged items.
